Direct Rails File Uploads to S3 on Heroku with Active Storage: The Complete How-To Guide

This article describes how to use Ruby on Rails to upload files and images to Amazon S3 on Heroku. In any Rails application, the traditional way to upload files is for the files to travel through the application and then stream to S3.
This is the default behavior of many popular Ruby gems, such as Paperclip, CarrierWave, and Active Storage. However, is this the best solution for Rails file uploads to S3 on Heroku?
While this solution works fine for smaller files, it can cause issues on Heroku when trying to upload larger files. This is because Heroku uses an ephemeral file system, so the larger files may be deleted from the dyno before the files can be uploaded to S3. Proxying upload requests through your application can also increase network traffic and server CPU usage.
What is the solution to Rails file uploads on Heroku?
One solution to this problem is “direct uploads." A direct upload is when the file is uploaded from the Client (browser) directly to S3. Direct uploads mean it doesn’t matter what the Heroku dynos do because the file never touches your application.
How can you do this in Rails 6 and beyond?
Active Storage was introduced as part of the Rails core in 6.1, and it is a good tool to use for direct uploads on Heroku. Let’s get started.
If you have an existing Rails application that needs direct uploading, jump to Step 3 to get right to the Active Storage code. Otherwise, let's scaffold a basic application to get started.
Step 1:
Set up a new Rails application in the folder of your choice:
.png)
Step 2:
At a minimum, you’ll need to add one model. You’ll create a user form with an avatar. Use the scaffold generator to create the necessary files:
.png)
You’ll also need a root route so you don’t have to manually navigate to the Users page. In your editor of choice, open routes.rb and add root to: users#index
Open the application to make sure it’s up and running: rails s and navigate to http://localhost:3000/.
You should see the users index page.
Step 3:
Add Active Storage. Active Storage uses three tables in your application’s database named active_storage_blobs, active_storage_variant_records and active_storage_attachments.
Add Active Storage and run the migrations:
.png)
Step 4:
Set up S3 and Active Storage credentials in storage.yml.
This tutorial uses S3, so you’ll need to add: gem aws-sdk-s3, require: false to your Gemfile and bundle install.
Open config/storage.yml.
Storage.yml is a configuration file that describes what storage services Active Storage will use to store the uploaded files. This tutorial will use S3, so uncomment the S3 section:
.png)
Step 5:
Next you'll need to tell Rails when to use each environment. It is highly recommended to use different environments for development and production.
For this example, you'll use S3 for both development and production to test the uploading and confirm files are placed in the correct bucket. Since you want to use AWS for both development and production environments, you’ll need to update config/storage.yml to have two AWS environments:
.png)
Now, you can tell Rails when to use each environment.
In config/environments/development, add the following line: config.active_storage_service = :amazon_development
In config/environments/production, add the following line: config.active_storage_service = :amazon_production
Set up your AWS credentials
Now, that you've added Active Storage, let's go to AWS services. Here you'll create your cloud storage account and set up your S3 buckets. If you have an existing account, go ahead and sign in. If you don’t have an existing account, go to aws.amazon.com and create a new account.
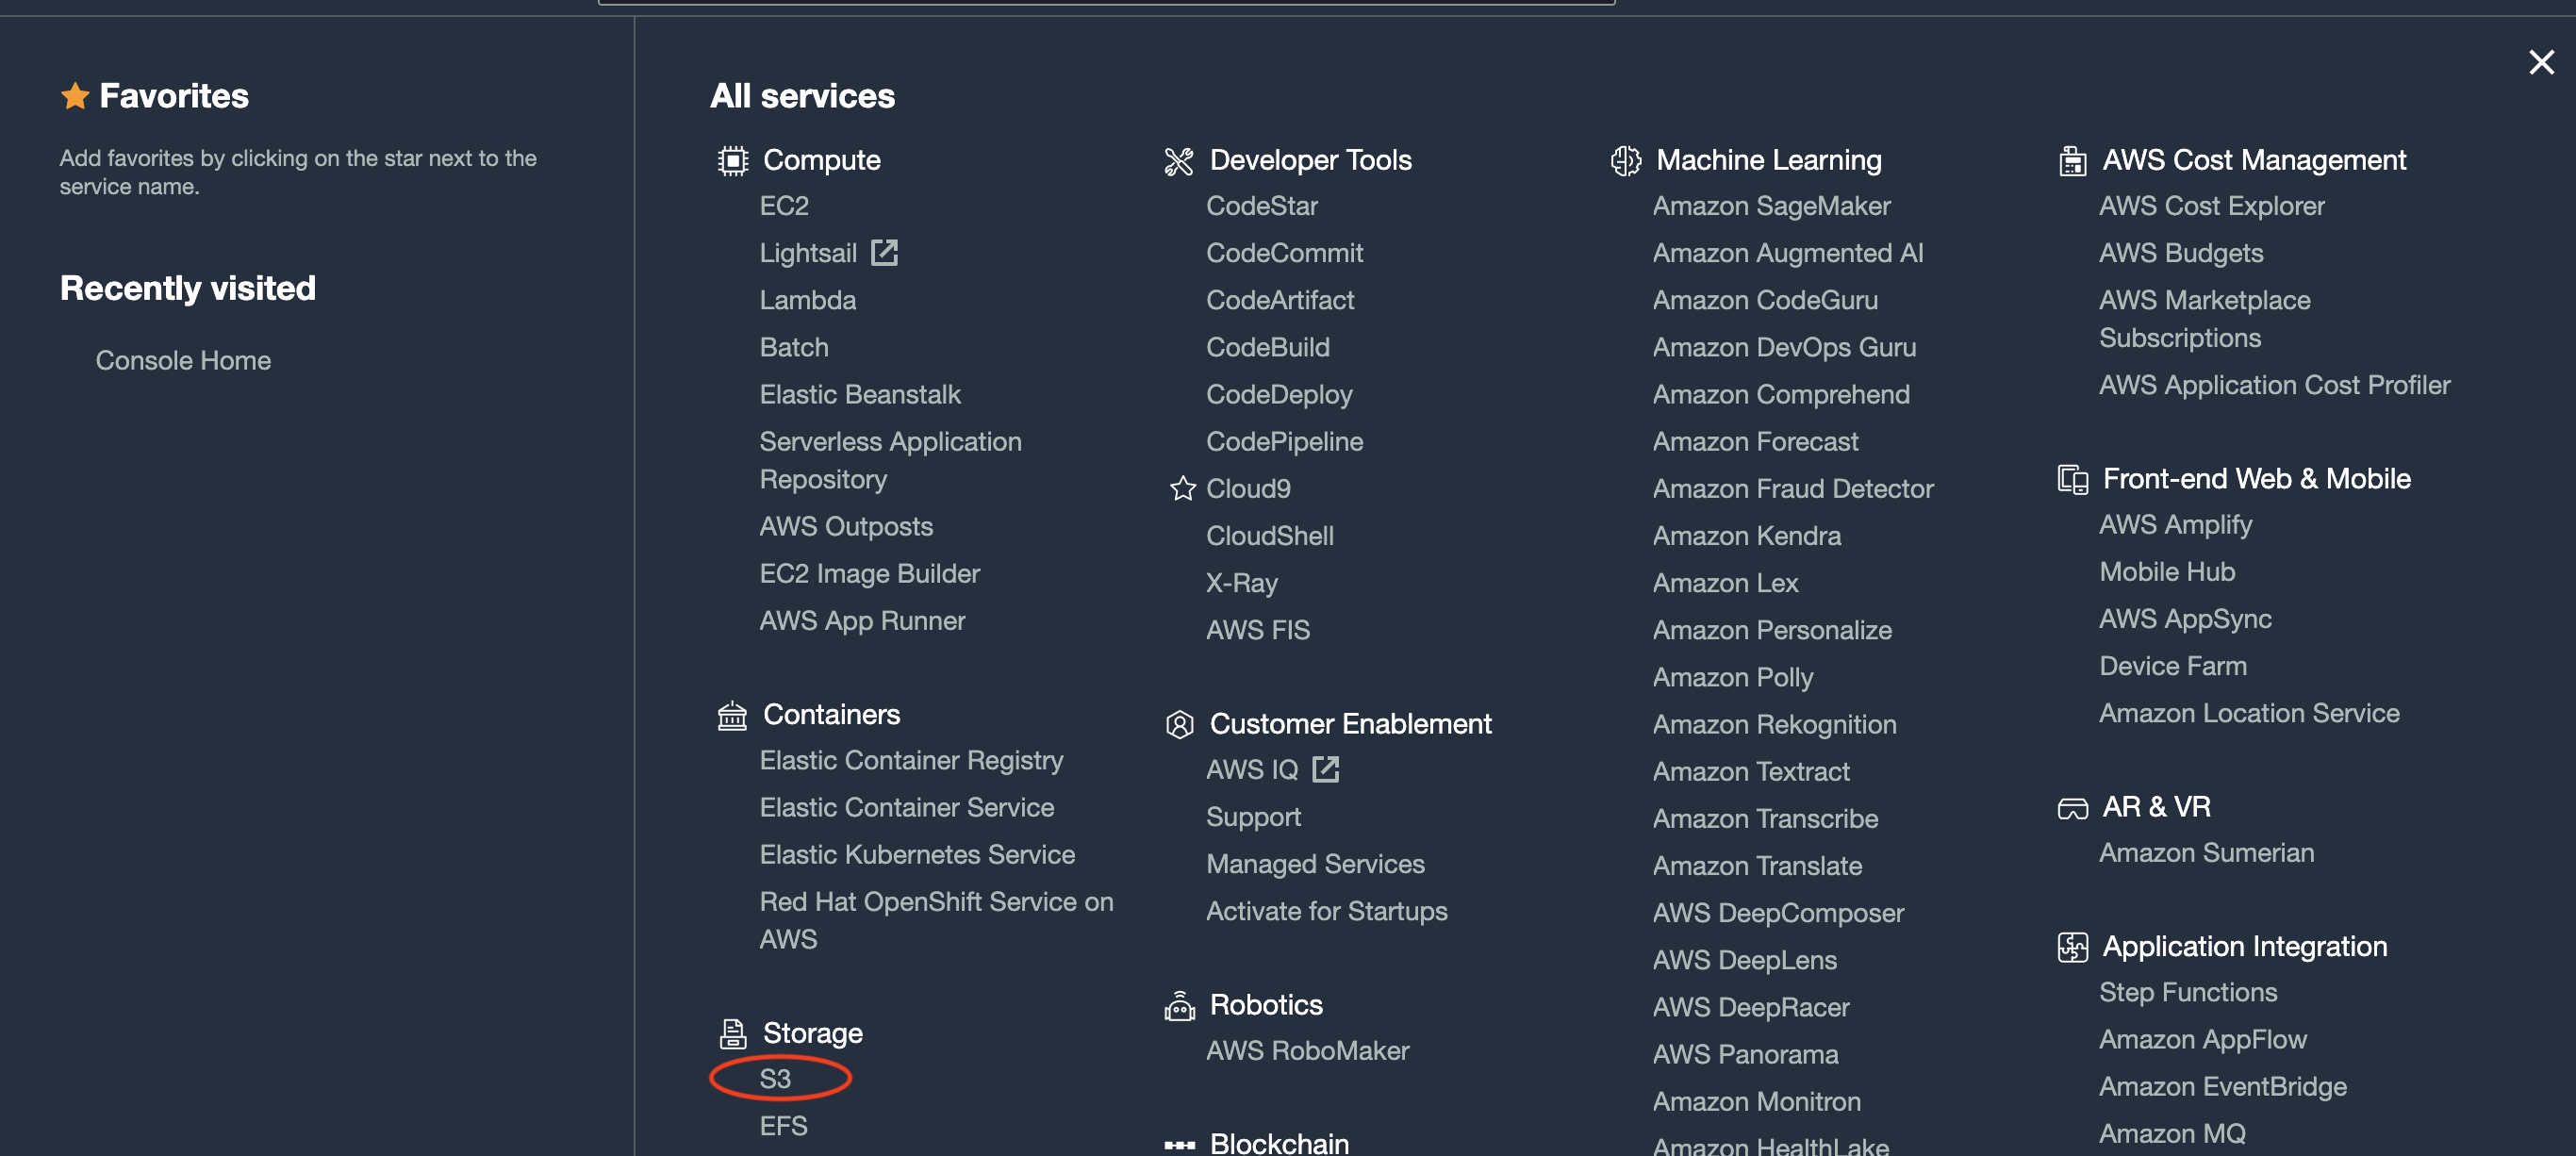
Step 1:
From the AWS console (once you have logged in), click on “Services" in the upper left-hand corner, and then click on “S3.”
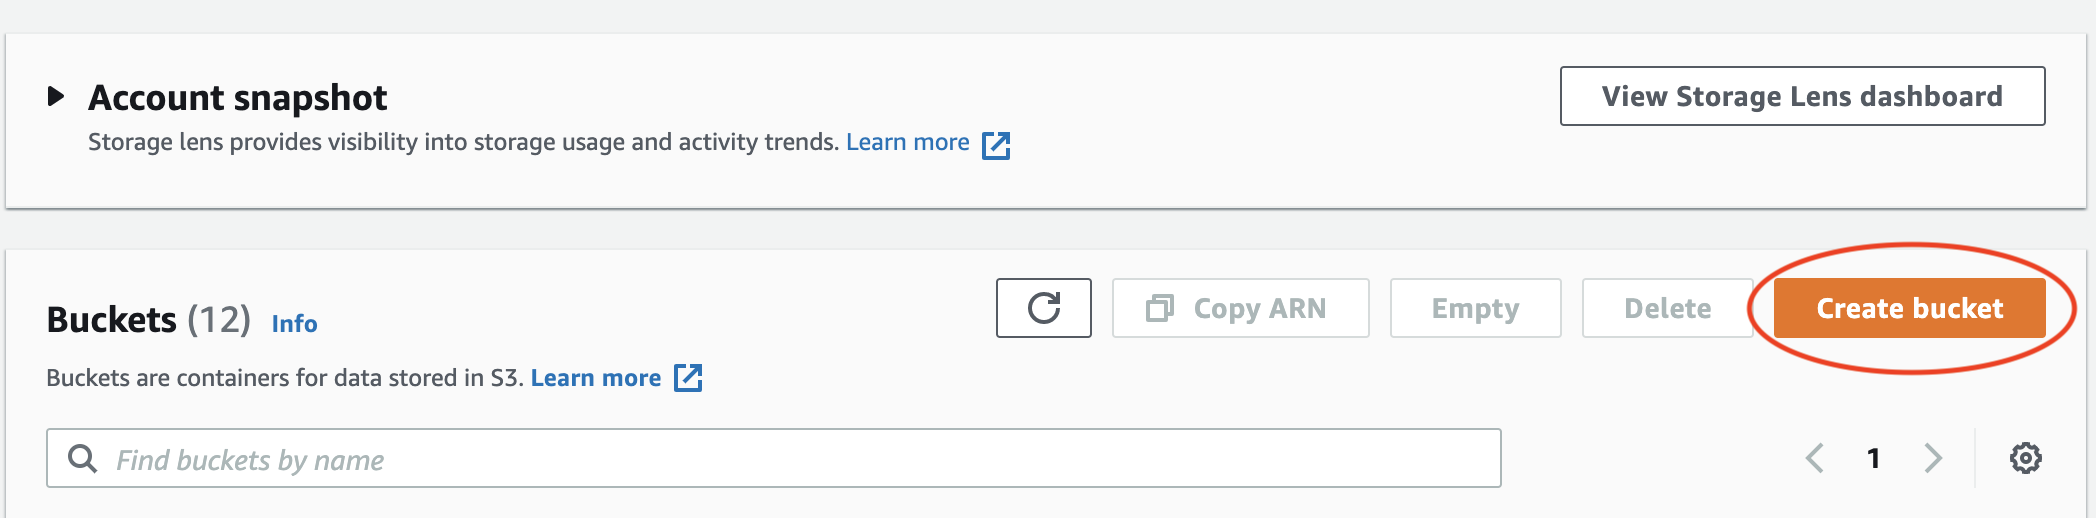
Step 2:
Click on “Create Bucket.”
Step 3:
From the next screen enter the bucket name. In this tutorial, you’ll set up the development bucket, so let's use the bucket name tutorial-development-bucket. Note that the production bucket will be set up in the same way. For now, add the bucket name and region and leave the rest of the settings on the default values. You’ll modify the settings later, as needed.

Step 4:
Next, you'll need to set up IAM credentials. You never want to use your root access credentials to create your API keys for security reasons. To create an IAM user, navigate to Services -> IAM (you’ll have to scroll).
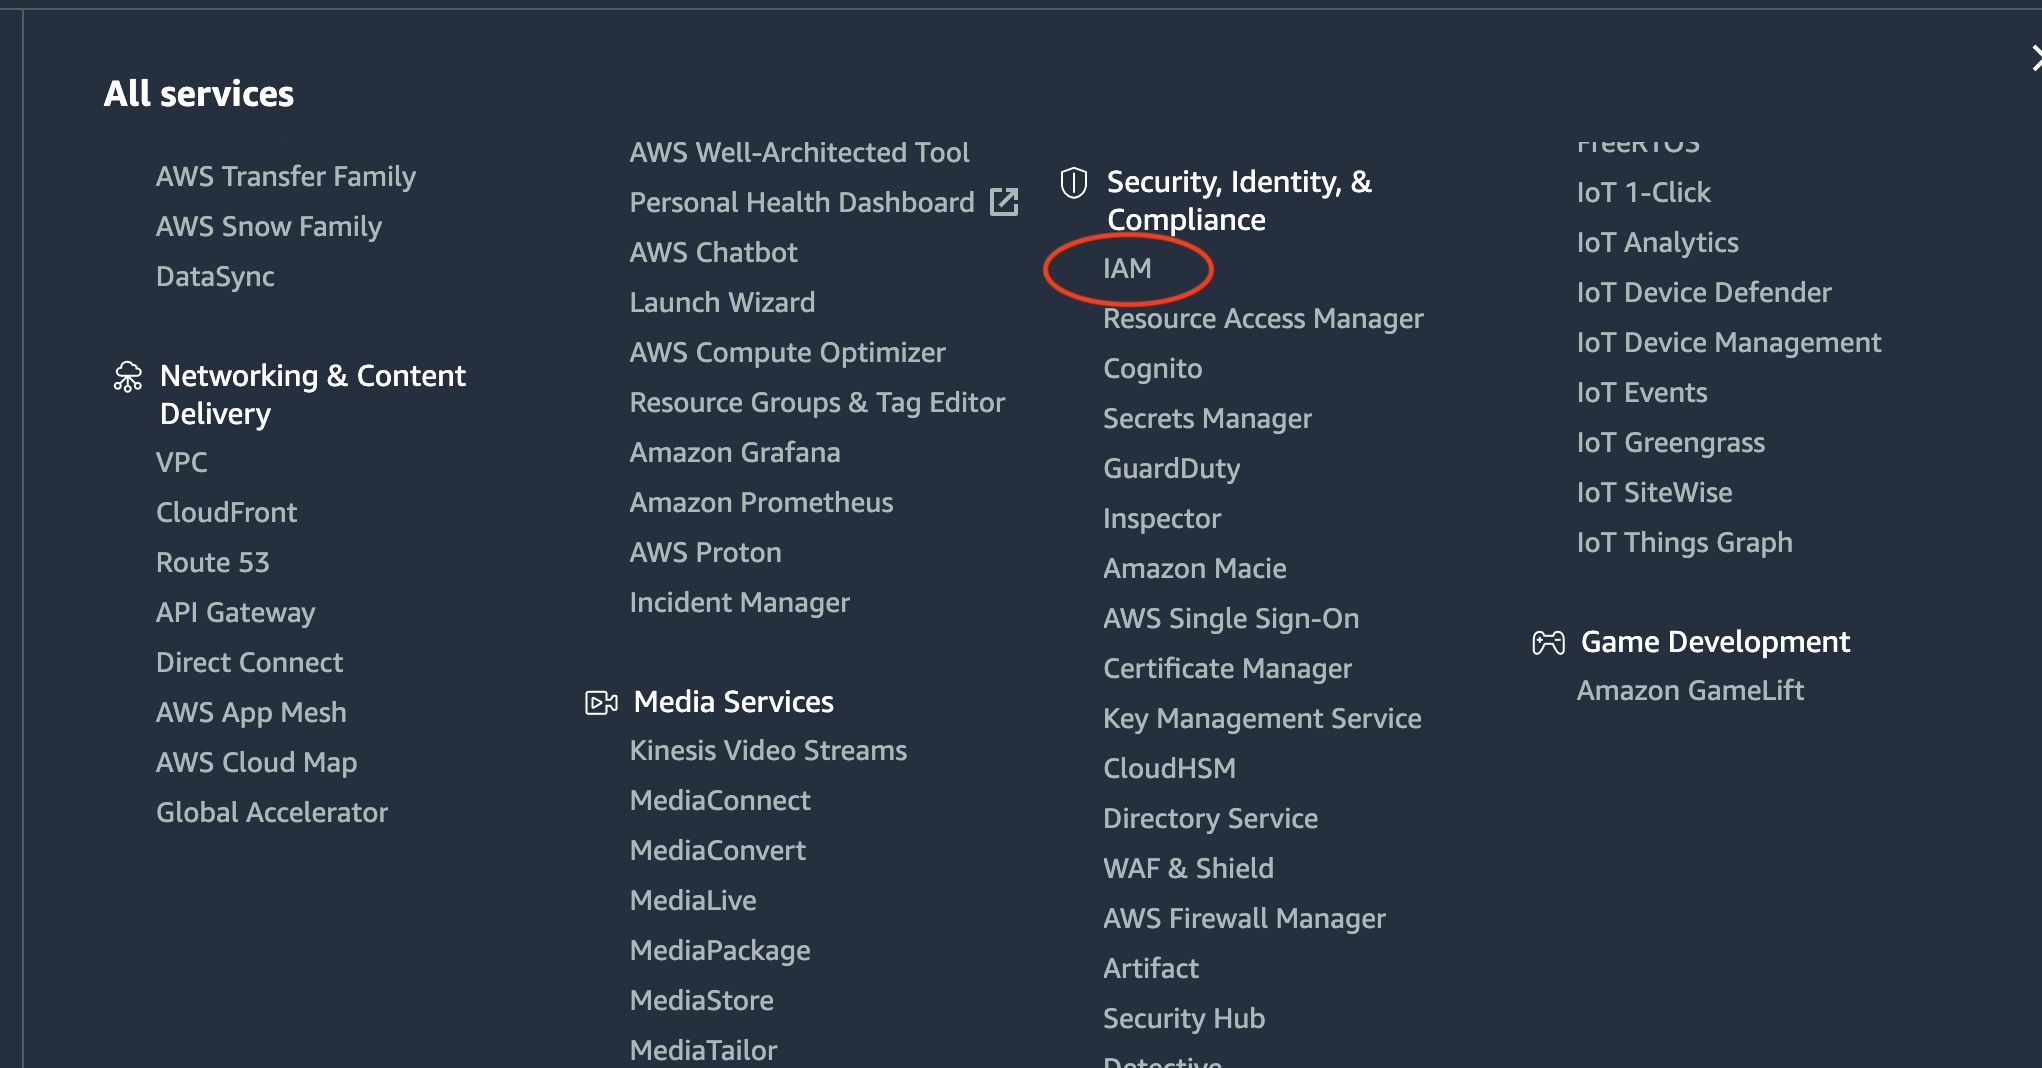
From the IAM dashboard, click on "Users" in the left-hand side navigation bar. Click on “Add Users” to add a new IAM user.

Step 5:
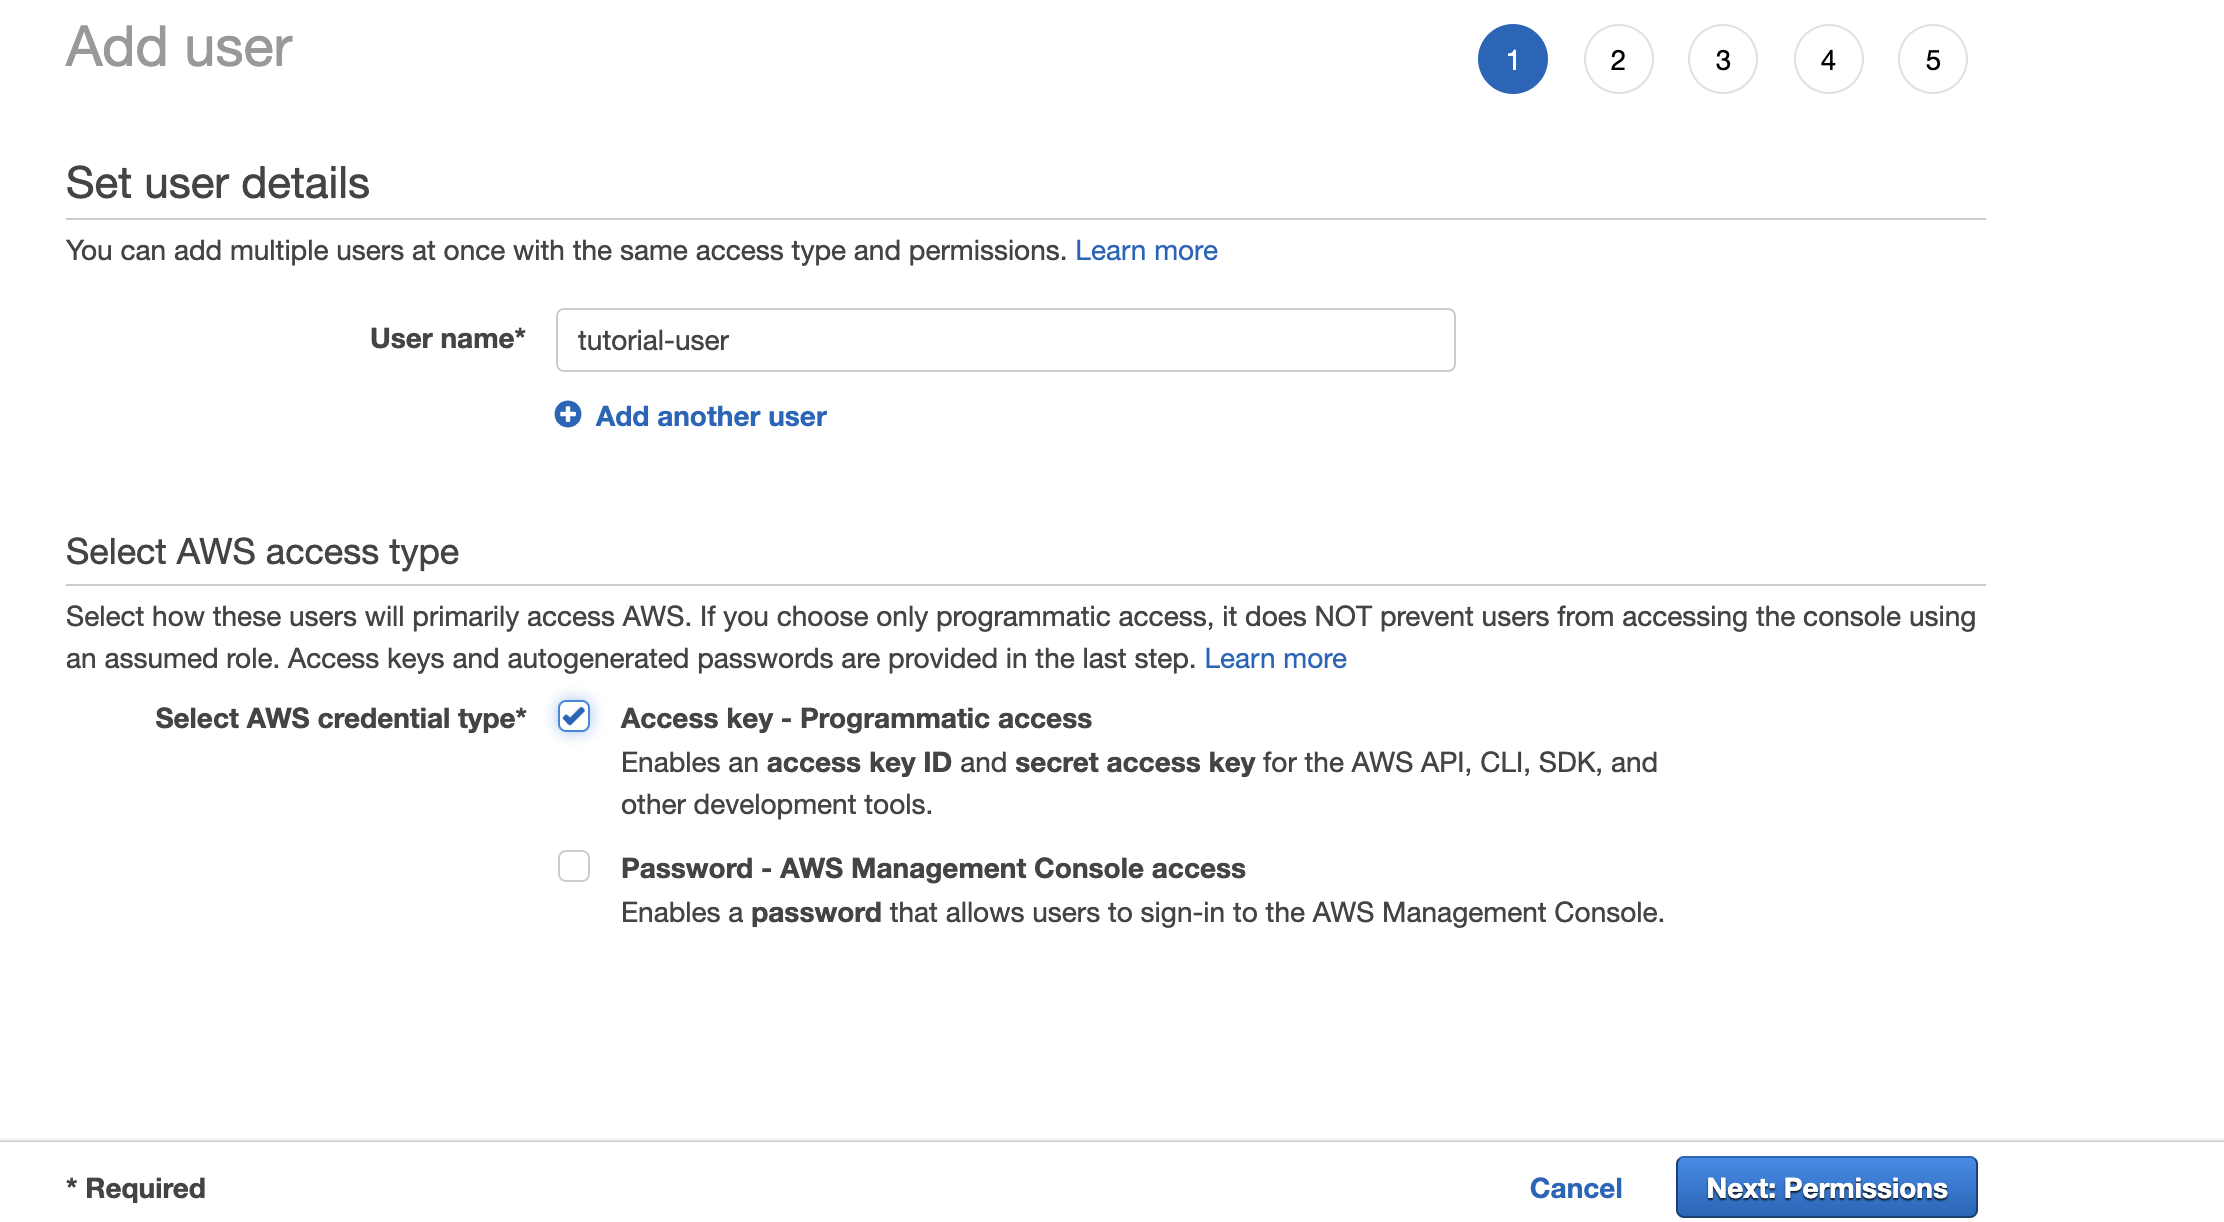
Add a user name. For this tutorial, let's use the name tutorial-user. You then have the choice to set programmatic access and/or console access. These API keys will be used by Active Storage to upload files, so you only need programmatic access here. Now, click on "Next-Permissions."
Step 6:
Here you have two choices - you can select “AmazonS3FullAccess” or you can create a custom policy. To further protect your account, let's write a custom policy. This will only allow access to the specific buckets that you’re using in this application. However, feel free to use the default S3 policy instead.
To create your custom policy, click “Create Policy.” This will be a new window that will allow you to specify your policy directly:

The following custom policy will allow you to create keys that can only access specified buckets:
.png)
This policy is separated into two parts because the list action is performed on the bucket itself, and the put/get/delete actions are performed on objects in the bucket.
Next, you'll click through the “Next buttons” until you get to the “Name your policy” page. Give the policy a specific name and a description so you'll remember what it is!
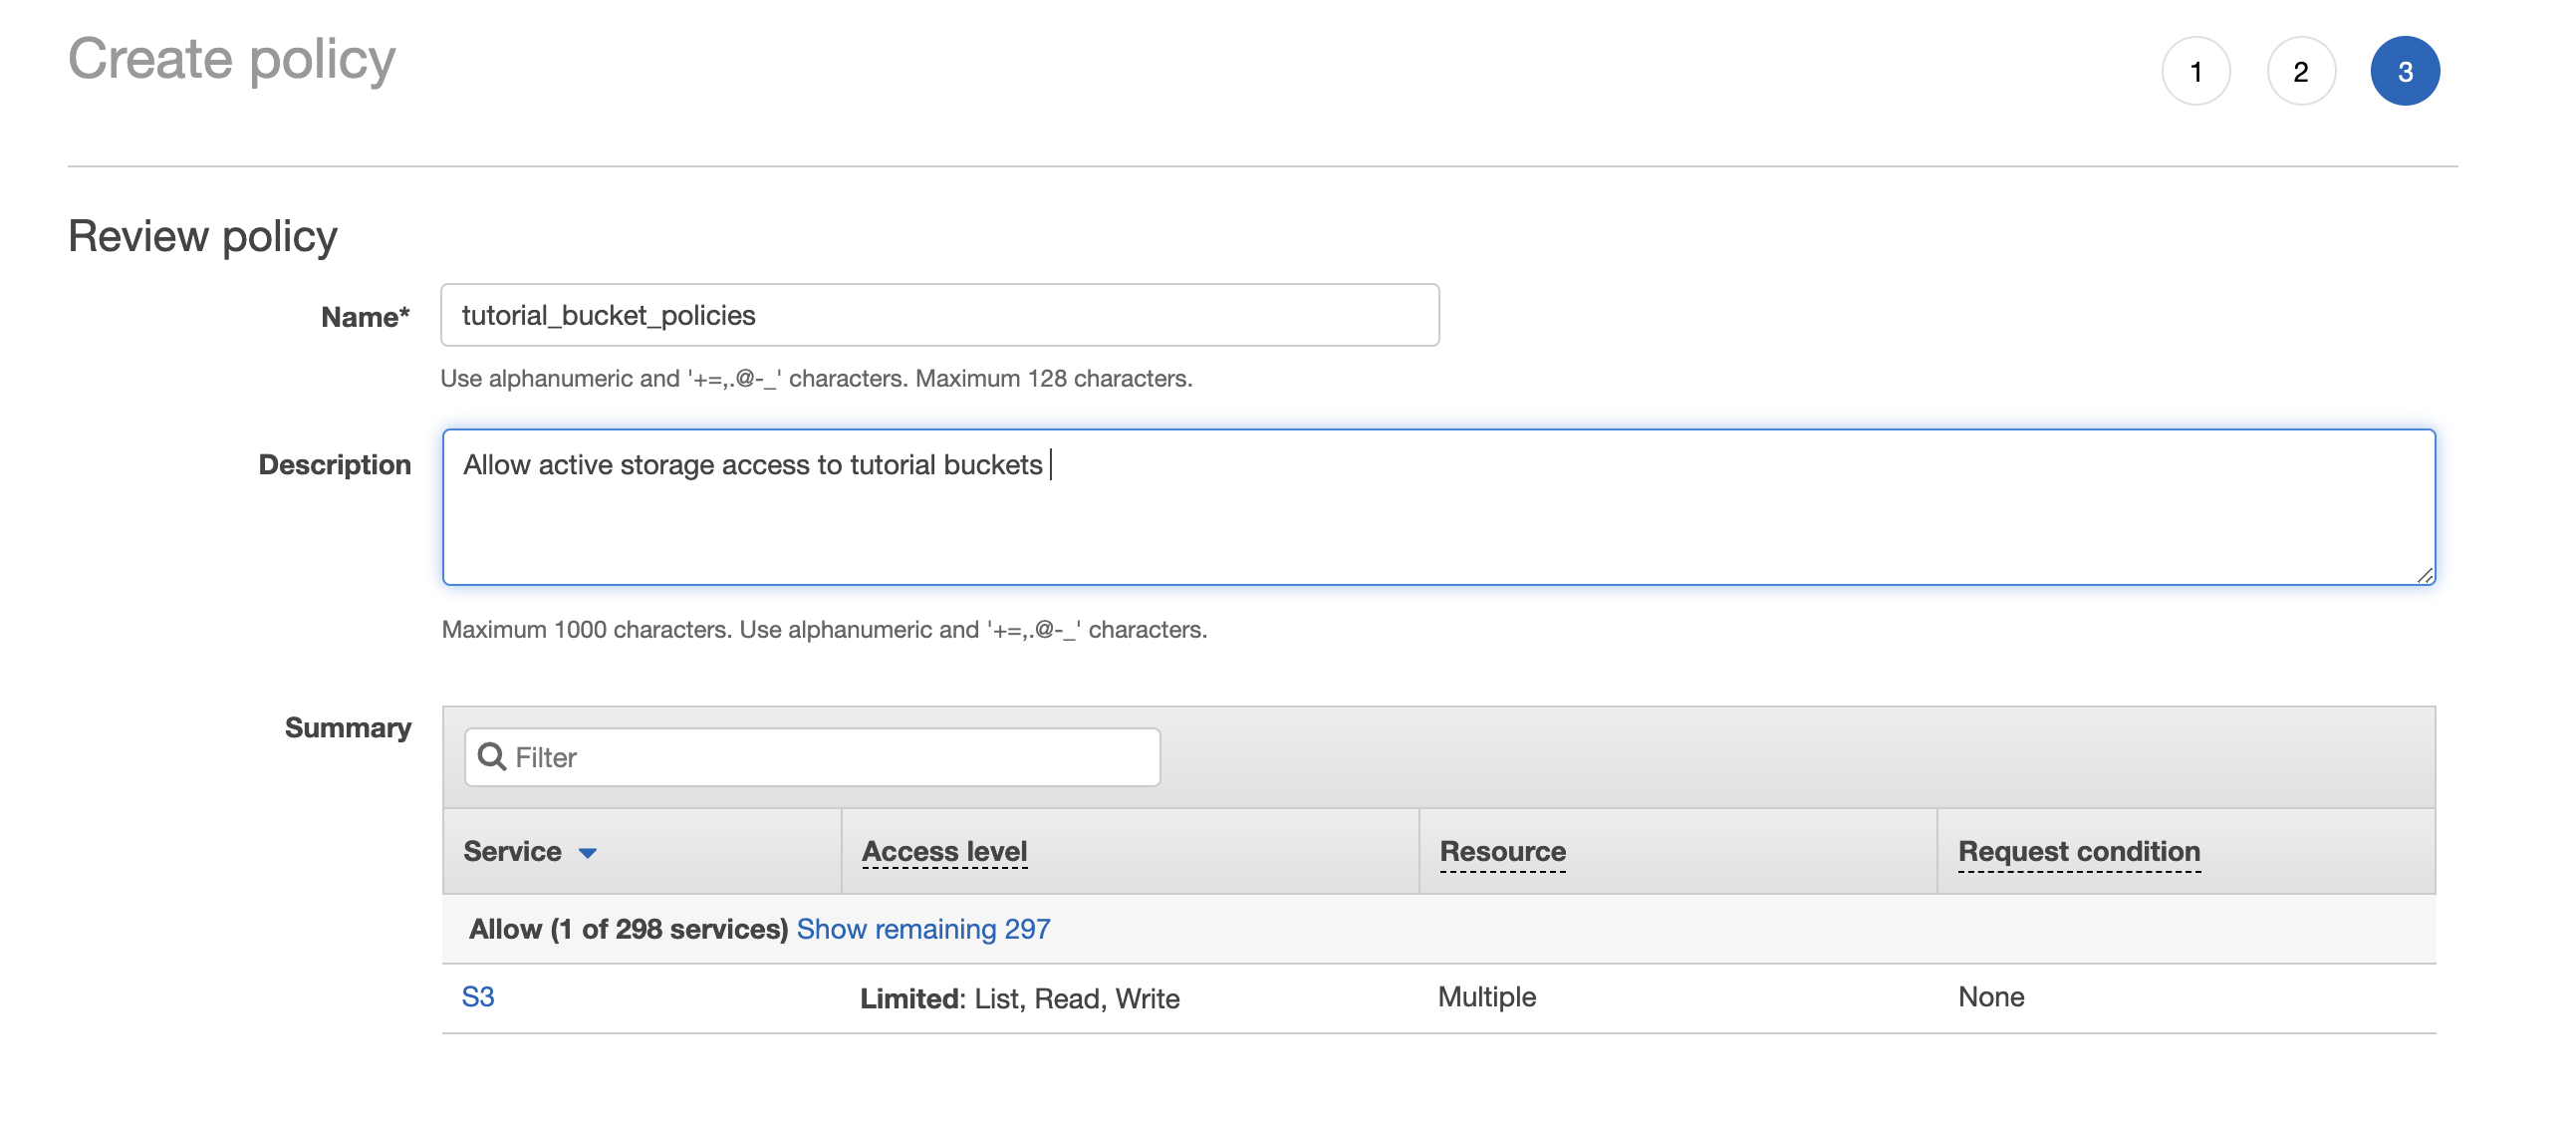
Click on “Create Policy” to finalize the policy.
Step 7:
Once the policy has been created, you'll need to create API access keys for the IAM user you just created. You should be directed to your IAM policy page. In the left-hand sidebar, click on “Users” again. Click on the user you previously created, and select “Attach existing policies directly.”
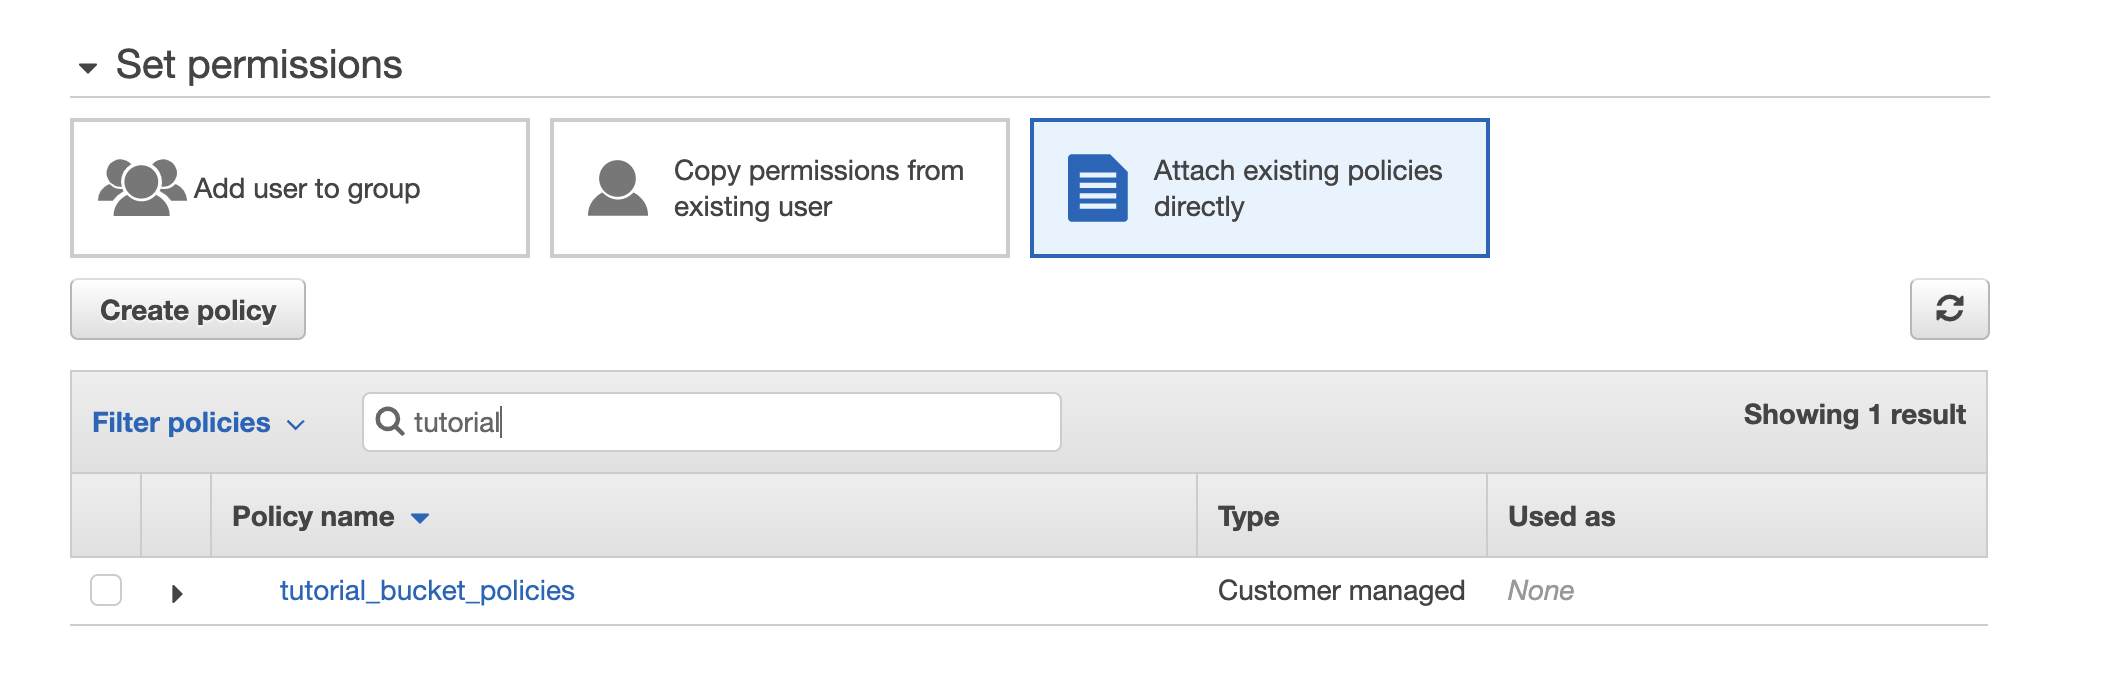
Check the policy that you just created, and click “Next: Tags,” then “Next: Review,” then “Create User.”
If this is successful, you'll now be on a screen that provides access keys. Download these keys and save them somewhere safe!

Quick reminder - you do not ever want to put your secret access key in plaintext in your application and push to Github.
If your keys are exposed, you can deactivate them and create new ones from the Users page.
Add the AWS keys to your Rails credentials
Step 1:
Open the Rails credentials file to edit using the following (replace “windsurf” with your editor of choice):
EDITOR='windsurf --wait' bin/rails credentials:edit
Your editor will automatically open `credentials.yml`. Add the AWS keys you downloaded earlier to this file, and close the editor. You can view the credentials at any time using: bin/rails credentials:show.
Step 2:
Add an Avatar to a User. Open models/user.rb and add has_one_attached :avatar:
.png)
Navigate to the user form page: app/views/users/_form.html.erb and add a file field to accept the avatar file: <%= form.file_field :avatar %>
You'll have to whitelist the avatar parameter in the controller. Open app/controllers/users_controller.rb and add avatar to the whitelisted parameters:
.png)
You’ll also want to be able to see the file once it’s been uploaded, so let’s add an image tag to your users#show page.
In app/views/users/show add <%= image_tag @user.avatar %>.
Step 3:
Now start up your Rails server rails s, add an image, and see it upload to S3!
Add direct uploads to your application
Now let's change this upload architecture to use direct uploads. There are just a few steps to add direct uploads to your application.
Step 1:
Add activestorage.js to your application. Depending on when you created your Rails application, it may already be included. To use the npm package in app/javascript/packs/application.js add:
.png)
Step 2:
Add direct_upload: true to your file field:
.png)
Step 3:
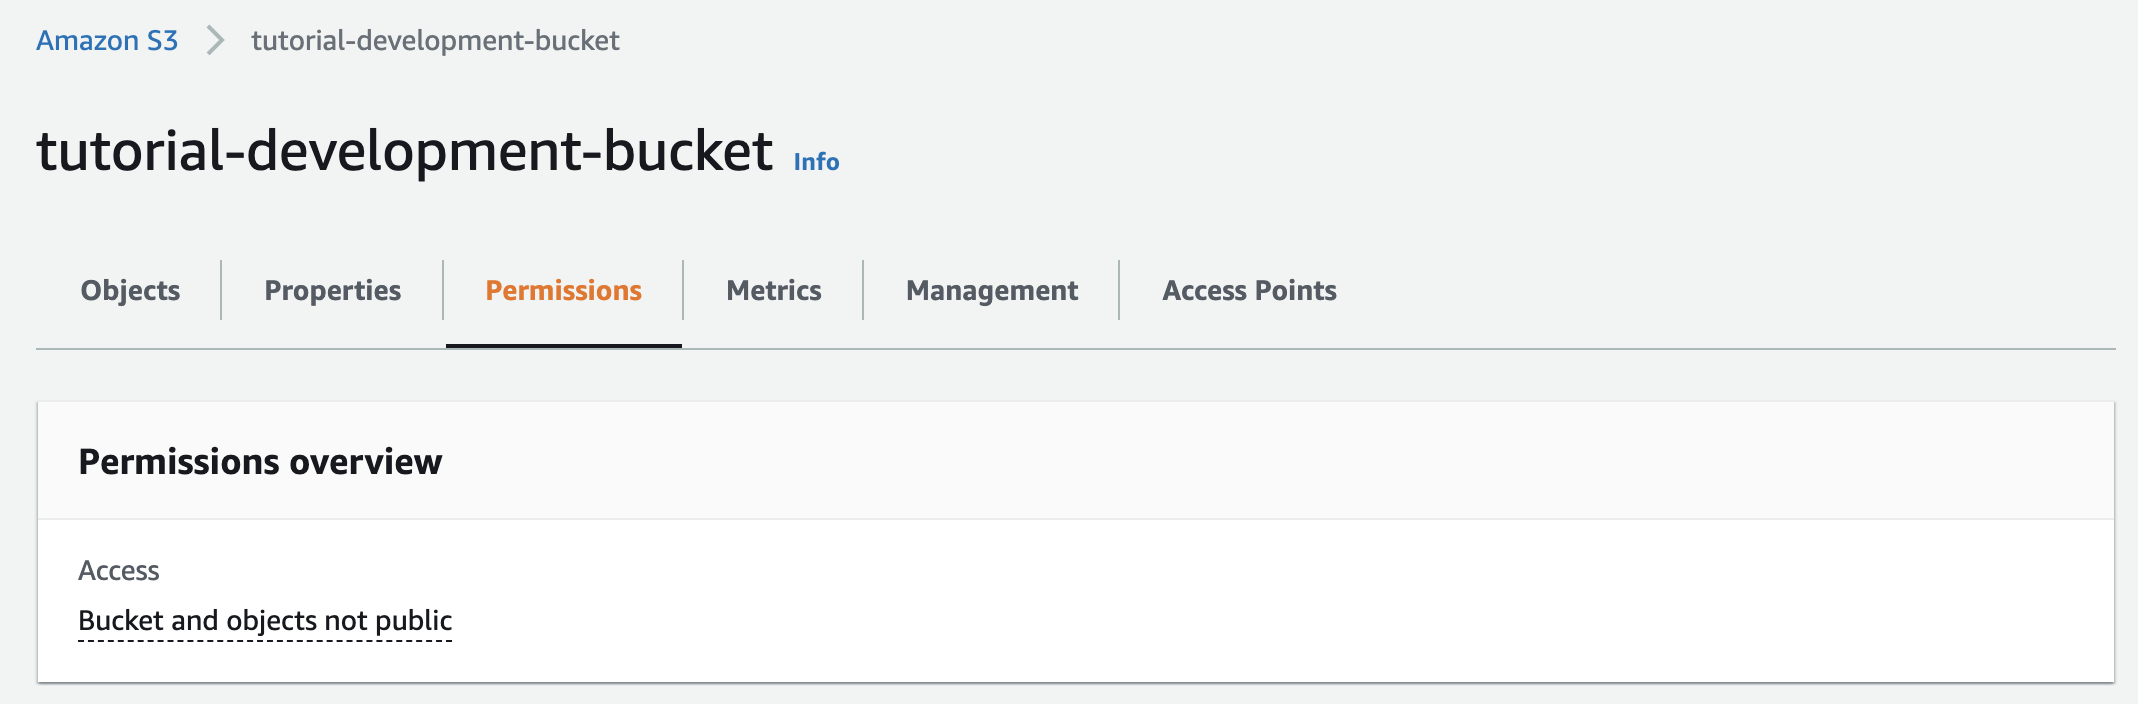
To use direct uploads with S3, you'll need to configure the bucket to allow cross-origin requests or CORS from your application. This is done by adding a bucket policy to the bucket. Sign in to your AWS account and navigate to your bucket.
Click on the “Permissions” header:
Scroll down to the “CORS policy” section (past the bucket policy section). Add the below policy. Change “AllowedOrigins” to be whatever domain you want to upload from. Remember, the allowed origins must be an exact domain match. In this example, “http://localhost:3000/" would fail because of the additional backslash:
.png)
Save the policy and return it to your rails application. Upload a file, and the file should directly upload to S3!
While this is an effective solution to Rails file uploads on Heroku, it is still a complicated and time-consuming process. This is why we created Simple File Upload, a web component that allows you to integrate file uploads into your website in minutes. No heavy lifting is required. Get started today for free!
Ready to simplify uploads?
Join thousands of developers who trust Simple File Upload for seamless integration.