Using S3 for Django File Uploads on Heroku

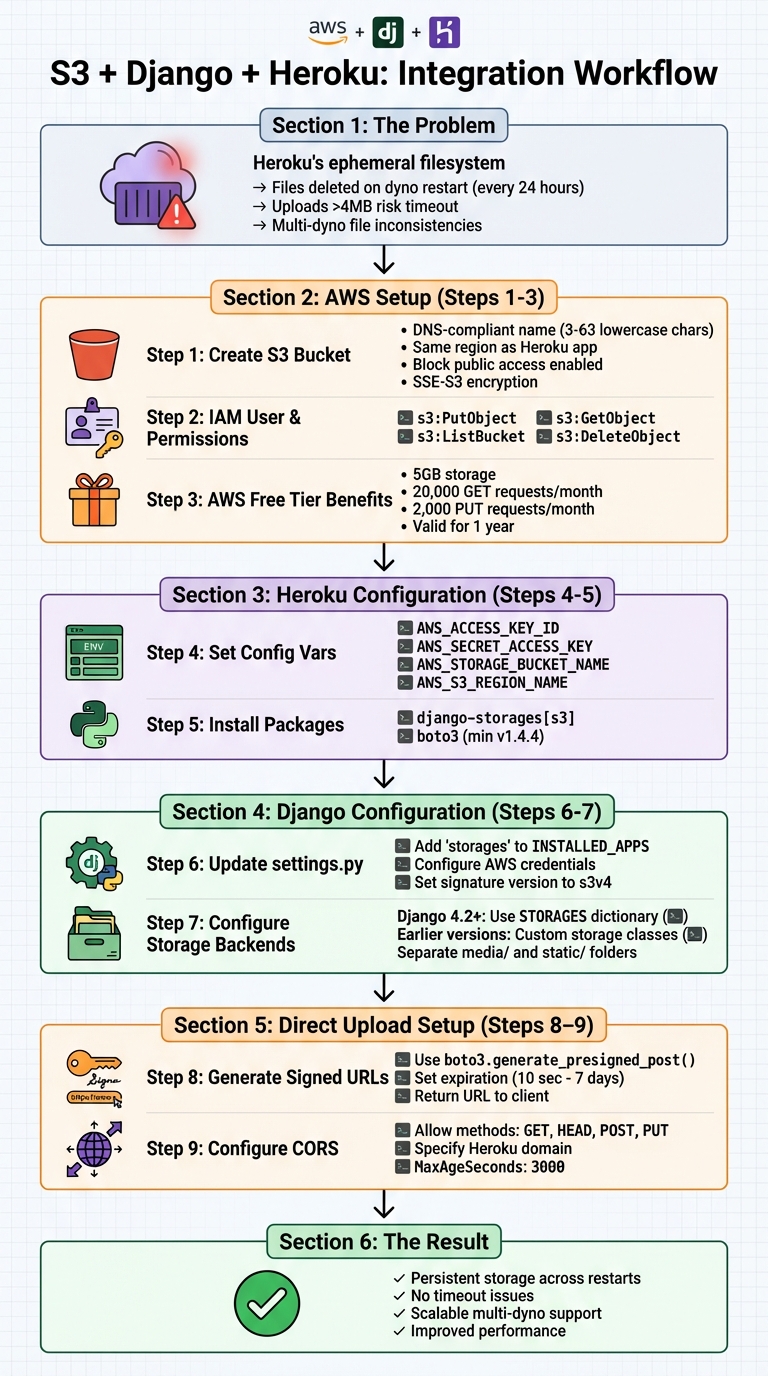
When deploying Django apps on Heroku, storing user-uploaded files presents a challenge due to Heroku's ephemeral filesystem. Files saved locally are erased when dynos restart (which happens daily), and uploads larger than 4 MB risk timeouts. Amazon S3 solves this by providing persistent, scalable storage that works seamlessly with Django and Heroku.
Key Steps:
-
Why Use S3?
- Files remain available despite dyno restarts.
- Avoids timeout issues for large uploads.
- Supports multi-dyno setups without file inconsistencies.
-
Setup Overview:
- Create an S3 bucket with proper region and permissions.
- Add AWS credentials to Heroku’s environment variables.
- Install required Python packages (
django-storages[s3],boto3). - Configure Django settings for S3 storage.
-
Direct Uploads to S3:
- Generate signed URLs in Django.
- Upload files directly from the browser to S3, bypassing Heroku.
-
CORS Configuration:
- Allow cross-origin requests to enable browser uploads.
Django S3 Integration on Heroku: Complete Setup Workflow
How to setup a Django 4.0 project with Heroku and AWS S3
Prerequisites and Setup
To integrate S3 with Django, you’ll need active AWS and Heroku accounts. If you’re new to AWS, take advantage of the free tier. It offers 5GB of S3 storage, 20,000 GET requests, and 2,000 PUT requests per month for a year - perfect for testing and small-scale projects.
Create an S3 Bucket
Start by logging into the AWS Management Console and navigating to the S3 service. Click "Create bucket" and pick a DNS-compliant bucket name. This means sticking to 3–63 lowercase characters, numbers, periods, and hyphens. Avoid underscores or uppercase letters, as they don’t meet DNS naming rules.
Next, ensure your bucket is in the same AWS region as your Heroku app (e.g., us-east-1 if your Heroku app is in Virginia). This minimizes latency and allows free in-region data transfers. Keep "Block all public access" enabled - access will be managed through IAM policies and signed URLs. For basic file protection, enable SSE-S3 server-side encryption.
Set Up Heroku Application
If you don’t already have a Heroku app, create one using the Heroku CLI or dashboard. You’ll also need the Heroku CLI installed to manage configuration variables. Add your AWS credentials and bucket details as Heroku Config Vars:
heroku config:set AWS_ACCESS_KEY_ID=your_access_key_id
heroku config:set AWS_SECRET_ACCESS_KEY=your_secret_access_key
heroku config:set AWS_STORAGE_BUCKET_NAME=your_bucket_name
heroku config:set AWS_S3_REGION_NAME=us-east-1
For security, avoid using root credentials. Instead, create a dedicated IAM user with a policy granting only the required permissions: s3:PutObject, s3:GetObject, s3:ListBucket, and s3:DeleteObject. This approach limits potential damage if credentials are compromised.
Install Required Packages
To enable Django to work with S3, install the necessary Python packages:
pip install django-storages[s3]
This installs django-storages, which integrates S3 with Django’s File Storage API, and boto3, the AWS SDK for Python (minimum version 1.4.4). Don’t forget to add these packages to your requirements.txt file so they’re included during Heroku deployment.
Once AWS and Heroku are set up, you’re ready to update your Django settings to use S3 for storage.
Configure Django for S3
Update Django Settings
Start by opening your settings.py file and adding 'storages' to your INSTALLED_APPS list. This enables the django-storages backend, which connects Django to Amazon S3.
Next, set up your AWS credentials using environment variables:
import os

AWS_ACCESS_KEY_ID = os.getenv('AWS_ACCESS_KEY_ID')
AWS_SECRET_ACCESS_KEY = os.getenv('AWS_SECRET_ACCESS_KEY')
AWS_STORAGE_BUCKET_NAME = os.getenv('AWS_STORAGE_BUCKET_NAME')
AWS_S3_REGION_NAME = os.getenv('AWS_S3_REGION_NAME', 'us-east-1')
AWS_S3_SIGNATURE_VERSION = 's3v4'
The AWS_S3_SIGNATURE_VERSION should be set to 's3v4' for compatibility with newer AWS regions.
Now, add these settings to fine-tune performance and security for handling S3 files:
AWS_S3_FILE_OVERWRITE = False
AWS_QUERYSTRING_AUTH = False
AWS_S3_OBJECT_PARAMETERS = {'CacheControl': 'max-age=86400'}
AWS_S3_FILE_OVERWRITE: By setting this toFalse, Django ensures that files with the same name won’t overwrite each other. Instead, it appends a unique identifier to the filename.AWS_QUERYSTRING_AUTH: Disabling this generates cleaner, more user-friendly URLs.CacheControl: Configures a 24-hour caching period for files, improving load times for frequently accessed content.
Once these settings are in place, you can move on to configuring storage for media and static files.
Configure Media and Static File Storage
If you're using Django 4.2 or later, the STORAGES dictionary replaces the older DEFAULT_FILE_STORAGE and STATICFILES_STORAGE settings. Here’s how to configure it:
STORAGES = {
    "default": {
        "BACKEND": "storages.backends.s3.S3Storage",
        "OPTIONS": {
            "location": "media",
        },
    },
    "staticfiles": {
        "BACKEND": "storages.backends.s3.S3Storage",
        "OPTIONS": {
            "location": "static",
        },
    },
}
This structure directs Django to save user-uploaded media files in a media/ folder and static assets like CSS, JavaScript, and images in a static/ folder, keeping your S3 bucket well-organized. If you need to build a custom interface for these uploads, check out this guide to HTML file uploads.
For earlier versions of Django (prior to 4.2), you’ll need to create custom storage classes. Add a storage_backends.py file to your project directory with the following code:
from storages.backends.s3boto3 import S3Boto3Storage

class StaticStorage(S3Boto3Storage):
    location = 'static'

class MediaStorage(S3Boto3Storage):
    location = 'media'
Then, update your settings.py file to reference these classes:
STATICFILES_STORAGE = 'yourproject.storage_backends.StaticStorage'
DEFAULT_FILE_STORAGE = 'yourproject.storage_backends.MediaStorage'
If you're deploying your Django app on Heroku and using the django-heroku package, it may override your S3 settings. To prevent this, include the following adjustment in settings.py:
import django_heroku
django_heroku.settings(locals(), staticfiles=False)
This ensures Heroku respects your S3 configuration instead of defaulting to local storage. Once everything is configured, Django will use S3 for all file operations, making your storage both persistent and scalable, even during Heroku dyno restarts.
Set Up Direct File Uploads with Signed URLs
Heroku's 30-second request timeout can be a challenge when handling large file uploads. Direct uploads to Amazon S3 help bypass this issue by sending files straight from the user's browser to S3, reducing server strain and avoiding timeouts. As computer scientist Will Webberley puts it:
"Using server-side processes for receiving files and transferring to S3 can needlessly tie up your dynos and will not be able to respond to simultaneous web requests as efficiently."
Here’s how it works: the client selects a file and requests a signed URL from Django. The backend generates a temporary signature using AWS credentials, and the client uses this signature to upload the file directly to S3. This approach keeps your application responsive while handling large file transfers efficiently.
Generate Signed URLs in Django
To generate signed URLs, Django can use the boto3 library. The generate_presigned_post method is particularly useful for browser-based uploads, as it supports multipart form data and allows you to set conditions like access permissions and content type.
Below is an example view in Django that creates signed URLs:
import boto3
import os
from django.http import JsonResponse

def sign_s3(request):
    S3_BUCKET = os.environ.get('S3_BUCKET')
    file_name = request.GET.get('file_name')
    file_type = request.GET.get('file_type')

    s3 = boto3.client('s3')

    presigned_post = s3.generate_presigned_post(
        Bucket=S3_BUCKET,
        Key=file_name,
        Fields={"acl": "public-read", "Content-Type": file_type},
        Conditions=[
            {"acl": "public-read"},
            {"Content-Type": file_type}
        ],
        ExpiresIn=3600
    )

    return JsonResponse({
        'data': presigned_post,
        'url': f'https://{S3_BUCKET}.s3.amazonaws.com/{file_name}'
    })
The ExpiresIn parameter specifies how long the signed URL remains valid. For security, keep this duration short - anywhere from 10 seconds to 1 hour is typical. Using AWS Signature Version 4, URLs signed with IAM user credentials can remain valid for up to 7 days. If temporary credentials are used, the URL expires when those credentials do, usually within 1 to 6 hours. Importantly, if a file upload starts just before the URL expires, the upload will continue until it finishes, even if the time limit is crossed during the process.
To make this view accessible, add it to your urls.py:
from django.urls import path
from . import views

urlpatterns = [
    path('sign-s3/', views.sign_s3, name='sign_s3'),
]
Once your backend provides the signed URL, the client-side code takes over to handle the file upload.
Handle Client-Side File Uploads
After obtaining the signed URL from Django, the client uses JavaScript to upload the file directly to S3. Here's a complete example:
function uploadFile(file) {
    const fileName = encodeURIComponent(file.name);
    const fileType = encodeURIComponent(file.type);

    // Request signed URL from Django
    fetch(`/sign-s3/?file_name=${fileName}&file_type=${fileType}`)
        .then(response => response.json())
        .then(data => {
            const formData = new FormData();

            // Add all fields from the presigned post
            Object.keys(data.data.fields).forEach(key => {
                formData.append(key, data.data.fields[key]);
            });

            // Add the file last
            formData.append('file', file);

            // Upload directly to S3
            return fetch(data.data.url, {
                method: 'POST',
                body: formData
            });
        })
        .then(response => {
            if (response.ok) {
                console.log('Upload successful');
            } else {
                console.error('Upload failed');
            }
        })
        .catch(error => console.error('Error:', error));
}

// Attach to file input
document.getElementById('file-input').addEventListener('change', (e) => {
    const file = e.target.files[0];
    if (file) {
        uploadFile(file);
    }
});
When uploading the file, avoid including your app's internal Authorization headers in the request to S3, as this can lead to CORS errors. Also, ensure the Content-Type specified when generating the signed URL matches the actual file type to prevent SignatureDoesNotMatch errors.
Configure CORS for S3
To allow direct uploads from your Heroku domain, you need to set up a Cross-Origin Resource Sharing (CORS) policy in your S3 bucket. Without this, browsers will block cross-origin requests due to the same-origin policy.
Update your S3 bucket's Permissions tab with the following CORS configuration:
[
    {
        "AllowedHeaders": ["*"],
        "AllowedMethods": ["GET", "HEAD", "POST", "PUT"],
        "AllowedOrigins": ["https://your-app-name.herokuapp.com"],
        "ExposeHeaders": ["ETag", "x-amz-request-id"],
        "MaxAgeSeconds": 3000
    }
]
Replace https://your-app-name.herokuapp.com with your actual Heroku domain. Avoid using "*" for AllowedOrigins in production, as this would permit any website to interact with your bucket. The MaxAgeSeconds setting caches the preflight response for 3,000 seconds, reducing latency for subsequent uploads.
If you'd rather configure CORS programmatically, you can use Boto3's put_bucket_cors method along with a CORSConfiguration dictionary. Keep in mind, you can define up to 100 CORS rules per bucket.
Deploy and Test on Heroku
Heroku's temporary filesystem means you'll need Amazon S3 for any persistent file storage. Here's how to complete your S3 integration for reliable storage on Heroku.
Set Environment Variables on Heroku
Heroku uses config vars to keep sensitive data, like AWS credentials, separate from your codebase. These variables remain intact across deployments and app restarts, and any changes to them will trigger an automatic app restart.
To set these variables, use the Heroku CLI with this command:
heroku config:set AWS_ACCESS_KEY_ID=your_access_key_id AWS_SECRET_ACCESS_KEY=your_secret_key AWS_STORAGE_BUCKET_NAME=your_bucket_name AWS_S3_REGION_NAME=us-east-1
Alternatively, you can configure them manually through the Heroku Dashboard. Go to your app's Settings, click Reveal Config Vars, and add each key-value pair. For security, always use an AWS IAM user with restricted permissions instead of root credentials. Also, ensure your S3 bucket is in the same AWS region as your Heroku app. This reduces latency and allows you to benefit from free in-region data transfers.
If you need to pull production config vars into a local .env file for development, run:
heroku config:get VARIABLE_NAME -s >> .env
To confirm that your variables are correctly set, use:
heroku config
Once your config vars are in place, you're ready to deploy and test file uploads.
Test File Uploads
Deploy your app with the following command:
git push heroku master
Then, run database migrations, collect static files, and open your app:
heroku run python manage.py migrate
heroku run python manage.py collectstatic
heroku open
After deployment, test your S3 connection by uploading a file through your app. Check the file's URL in your browser's Network tab to confirm it's being served from an S3 domain. In December 2020, developer DmitOlegovich demonstrated this approach by verifying that a Bootstrap stylesheet loaded successfully from an S3 domain.
If file uploads fail, check Heroku's real-time logs for errors:
heroku logs --tail
A common issue is a 403 Forbidden error, which usually means your IAM user lacks the required permissions. Ensure your IAM policy includes the actions s3:PutObject, s3:GetObject, and s3:ListBucket for your bucket. If files vanish after 24 hours, it likely means your app is still using Heroku's local filesystem instead of S3.
For Django users working with django_heroku, make sure to include this line in your settings:
django_heroku.settings(locals(), staticfiles=False)
This prevents the package from overwriting your S3 configuration.
Conclusion
Using Amazon S3 with your Django application on Heroku ensures your files are safe and always available. Since Heroku dynos restart at least once every 24 hours, any files stored on Heroku’s ephemeral file system disappear. By storing files in S3, you create a dependable, centralized location that keeps your files accessible across all dynos.
This setup also improves performance. By offloading file storage and delivery to S3, your dynos can focus on handling web requests instead of managing file transfers, which helps your application run more efficiently.
In addition, S3 is a game-changer for scaling. In environments with multiple dynos, relying on local storage can cause issues - files uploaded to one dyno won’t be available to others. S3 eliminates this problem, enabling your application to scale smoothly across multiple instances without worrying about file consistency.
FAQs
Why is Amazon S3 a reliable choice for file storage with Django apps on Heroku?
Amazon S3 provides reliable and long-lasting storage, which is crucial for Django apps running on Heroku. Since Heroku’s filesystem is temporary - meaning any files saved to it can disappear during dyno restarts or deployments - S3 ensures your files stay safe and accessible no matter what.
Beyond that, S3 offers excellent availability and the ability to scale seamlessly. This makes it a perfect fit for managing file uploads and distribution in production settings, helping your app handle user-uploaded files effectively while staying dependable over time.
How can I securely configure AWS credentials for a Django app on Heroku?
To securely set up AWS credentials for your Django app on Heroku, consider these important steps:
- Keep credentials out of your code. Store sensitive information in Heroku Config Vars instead of hardcoding them.
- Follow the principle of least privilege. Restrict AWS credentials to only the permissions your app absolutely needs.
- Rotate access keys regularly. This minimizes the risk of misuse if a key gets exposed.
- Enable multi-factor authentication (MFA). For accounts with higher privileges, MFA provides an additional security layer.
- Monitor AWS account activity. Watch for any unusual behavior to catch potential issues early.
When possible, use temporary credentials or IAM roles instead of relying on long-term access keys. These practices help secure your AWS resources while allowing your app to interact safely with S3.
How do direct uploads to S3 prevent Heroku's timeout errors?
Uploading files directly to Amazon S3 sidesteps Heroku's 30-second request timeout by letting files bypass the Heroku server altogether. Rather than routing uploads through your backend, files are sent straight from the client to S3. This ensures longer uploads complete without being interrupted.
By taking this route, you not only improve upload reliability but also ease the workload on your server. It’s an effective way to manage file uploads in Django applications running on Heroku.
Related Blog Posts
Ready to simplify uploads?
Join thousands of developers who trust Simple File Upload for seamless integration.